Map Tiles Evolution & Lighten the Load
Evolution of Map Tiles
Originally, the approach to the map tiles utilized a four square grid bisecting a single tile. Combinations of each tile type are below with grass and dirt. After testing, we came to the realization that specific conditions at the diagonal edges of each tile would not be covered in the rudimentary four square tile system.

Following the four square approach, we decided to try a splatter tile approach. This allows for a style of graphics that overlays adjacent tiles and is less precise. The proof of concept splatter tiles for grass and dirt are shown below.


Implementing the tile set above achieved a somewhat ‘boxy’ aesthetic, resulting from the rectilinear shapes of the tiles. More irregular shapes were explored in following versions along with hand drawn textures to produce a more organic feel.


Above is an in-game view of the splatter tile approach. Every tile is oversized and overlapping its neighbors, this allows for a seamless look to the map. Splatter tiles were very convenient for us because it did not require calculation of an individual tile’s edge cases. One drawback is z-fighting between neighboring tiles if special accommodations are not met, as pictured below. Tiles occupying the same space flutter in and out of existence, which is not ideal.

The splatter tiles do not give us as much control over the look of the map and how our buildings interact with it. The irregular edge conditions of the splatter tiles clash with the strict rectilinear footprint of our troughs and buildings . This lead us to abandon the approach. Specifically, our troughs are now sunk into the ground. Our decision to lower the troughs into the ground was both aesthetic and practical. Another reason for this design change is the introduction of water tiles into our game. The vision for the water areas of our map worked well with the edged tile design, so we adopted that approach for the rest of our map.
Below are some initial splatter tiles for the newly added swamp biome, including swamp water and land tiles. As with the tiles sets shown previously, these tiles were hand drawn in photoshop with several layers and blending modes utilized to achieve the final result.

Ditching the splatter tile approach, we moved back to the gridded tile method. This time each tile split into thirds both horizontally and vertically, resulting in a nine square grid. This allows for the edge conditions at the corners of the square, such as inside and outside corner edges. A master tile set is arranged in such a way that each edge condition is included and flows into neighboring tiles. This continuous arrangement allows for seamless continuity at the edges both when drawing texture and in implementation. A python script was coded to cut up the master tile set into individual 512x512 pixel tiles to speed up exporting and implementation.
Swamp tiles are redrawn in the nine square gridded method, along with a purple / pink color palette as shown below.

After dealing with the edges, we decide to tackle pure biome tiles (100% grass tile, 100% dirt tile, etc.) to inject some irregularity and make the map look seamless. Below are both 5 tiles x 5 tiles texture sheets and one 512 x 512 pixel tile depicting a seamless approach based heavily on Perlin noise and drawn textures.


Ultimately, the hand drawn elements of the texture created visible edges in the map once implemented. A hybrid approach, as shown below, was adopted to have tiles that flowed seamlessly together in the map and provided irregularity in the middle of each tile.

With this change in the map tile design came some back-end changes to accommodate. Edge cases needed to be calculated for each tile, as mentioned in the previous blog post. Also, because there are now more tile types to convert into blob assets, our method of converting prefabs into Unity ECS entities needed to be streamlined. This will be addressed in a later post. Another change we made was to adopt a hybrid approach between edge tile designs and splatter tile designs. Our map now consists of ‘edge’ tiles and ‘full’ tiles which make up the base layer of our background. Another pass is then made to paste ‘decal’ tiles on top of our base tiles.

These decal tiles are similar to splatter tiles, however, they are cut into individual sections to allow us to move them appropriately when troughs are placed. When troughs are placed, the map tile underneath is moved down to prevent overlapping. The ‘decal’ tiles break up some of the patterns that emerge from our individual tiles and create a more organic feel to our biomes. This hybrid approach gives us both the precision of the nine square approach and the irregularity of the splatter tile method simultaneously. Our map generation is still an ongoing process, but we are very happy with the new direction and are excited to finish it out!
Stay Classy Internet,
Oggy and Will
Lighten the Load
I kicked my week off with the idea of redesigning the junction trough to something new that would have a unique feel. I started on some renders to help visualize the concept, and halfway through ended up scrapping the idea as it really didn’t feel unique. With my target out of the picture I found my self wanting to test the performance of the new troughs. I setup our test case which was around 1,500 troughs and let the resources rack up to test a new max number. Our previous tests were around 2,500 dynamic bodies (resources) rolling around at 144 fps. With the new troughs we hit about the same number 2,500-3,000. A little improvement, which is great considering the amount of detail added in the new trough design. 3,000 is cool, but I really wanted more on the screen and thus began the rabbit hole I put myself in this week.
I wanted to reduce the stress on the GPU, and the resource physics take most if not all the load. We currently use the Havok engine for our and it has proved to be very powerful. We have thousands of tiny low complexity meshes colliding constantly and Havok handles it well. I was flying blind into a solution to fix this problem as I’m not classically trained and the resources for this kind of situation with DOTS is limited.

First let’s start with how the troughs currently move resources. There are 3 Systems that run the resource movement: the Collision System, Trough Collision System, and Resource Movement System. The Collision System populates buffers on the troughs and is issued by built-in Collision Events from Unity. The Trough Collision System takes that buffer information checks that the resources are moving in the right direction, and if they are not, they update them to do so. Lastly the Resource Movement System takes the information modified by the troughs and applies force in that direction. My first thought was that every trough’s collision buffer is being populated per frame regardless of the resource’s direction. To put this into perspective if we have 1000 resources at 144 fps, and about every other frame is a physics-step, that’s 60,000 collision events. Buffers being filled and dumped, and booleans being checked every second! Seemed expensive to me so I set my sights on rethinking this idea.
I did some digging, and through trial and lots of error, had a working concept. Resources would now collide with box colliders paired to the troughs ONLY IF the trough was facing in a different direction. This effectively removed thousands of checks per second, especially in long strait lines. Now on to testing.

In theory I felt like I would see a huge improvement in the Havok system as there are considerably less active collision events to process. Unfortunately, this just didn’t improve performance, or reduce weight on the GPU. This surprised me a lot. I ended up stashing my changes for this and moving on to a new direction.
I spent about 10 minutes looking into how the Settings for the Havok System worked and BAM, doubled our performance.
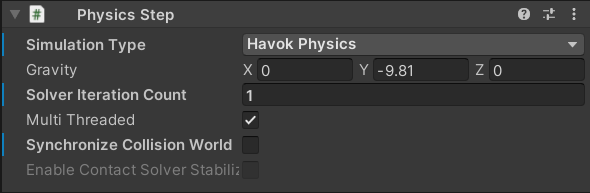
Well, that was easy.
Because we aren’t using our Jump troughs anymore there currently isn’t a reason to have more than 1 solver iteration on the rigid bodies. In the past without the 2nd iteration, resources being launched from the Jump trough would simply drop right through the landing trough collider and go under the ground never to be seen again. Also, I don’t see a current benefit to Synchronize Collision World as it just seems to add overhead without us enabling it with a purpose.
Looking in the future, I believe we can drastically improve the count here, so much so that we wouldn’t have to be concerned about a maximum amount. Through testing and messing around with what I currently know, I can’t see a way to surpass this rigid body count. Good news is that you shouldn’t be able to put 5,000 resources on your screen at one time, meaning that we might be able to place some magic behind the scenes for the resources off the screen, but that is a much bigger task.
A side note, I reduced the Friction component on the resources so that they no longer get stuck when fully saturated.

With me hitting a wall on the count of resources, I moved on to something else that takes up GPU processing, the rendering of our scene. With the new trough implementation came lots of new meshes that all had to be rendered individually. The most repeating mesh was lights, as there are at least 40 per trough. What this equated to was 40x16 due to all of the variations. 640 unique meshes just for lights, this is bad. I lowered that down to basically 12 unique meshes that you can use as “parts”. But I didn’t stop there. I had a thought that most troughs are actually very similar, so why not treat them like I did the lights? We now use different parts and assemble them together to make the version of the trough you want!

The results on this are interesting. I haven’t used the Frame Debugger or the SRPBatcherLog much, but I wanted to get a bit more familiar with them. Here is the SRPBatcher logs on both.
We definitely saved rendering time here, at least at small scale, the next interesting part was when you have hundreds of them on screen, how do they perform? The refined troughs simply performed better. As an added note, the new version has the Shadows enabled too!

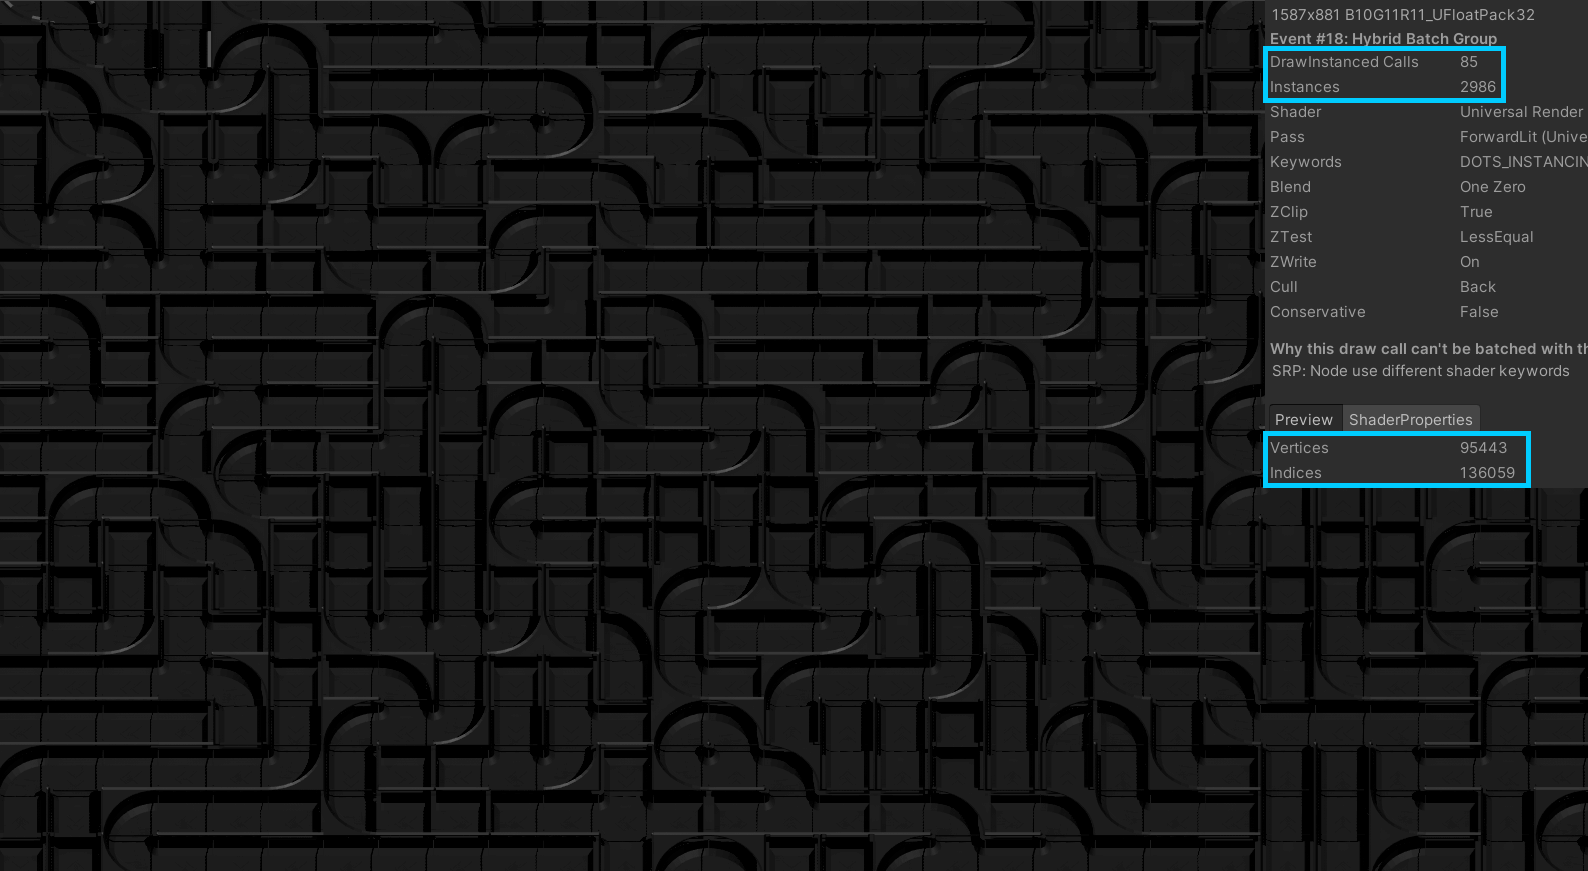
Key thing to look at here is the draw instance calls, instances, Vertices, and Indices.
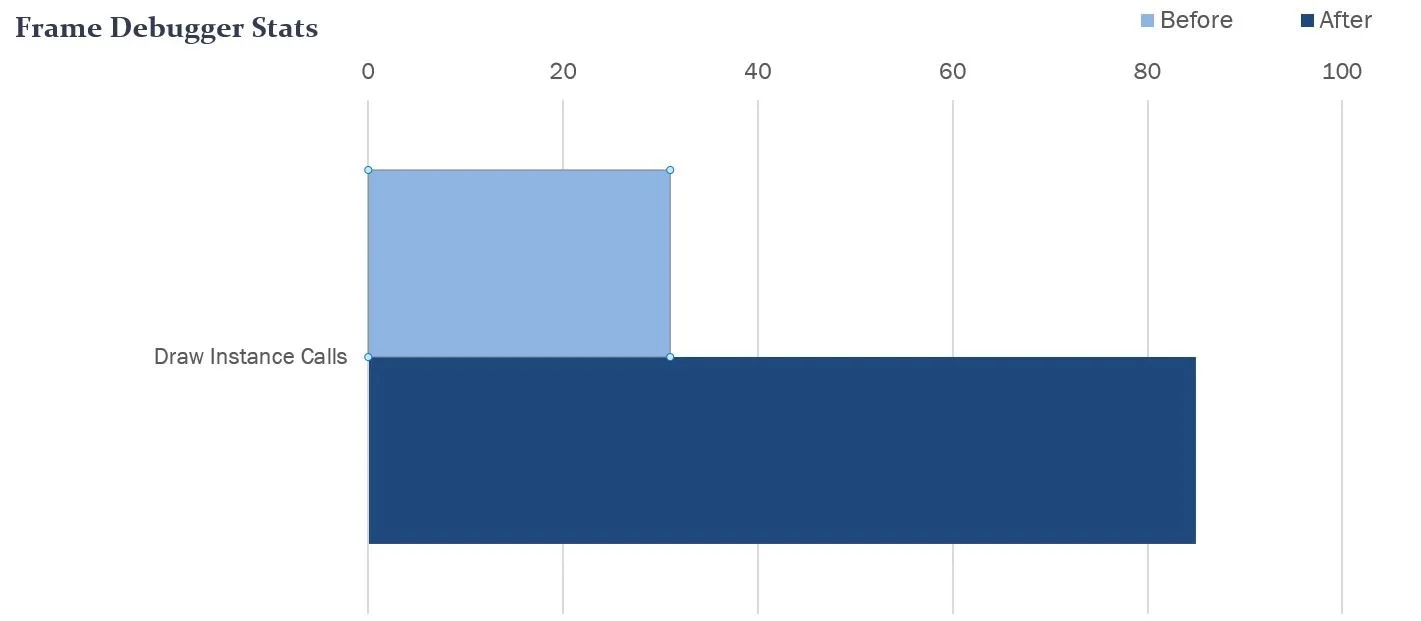
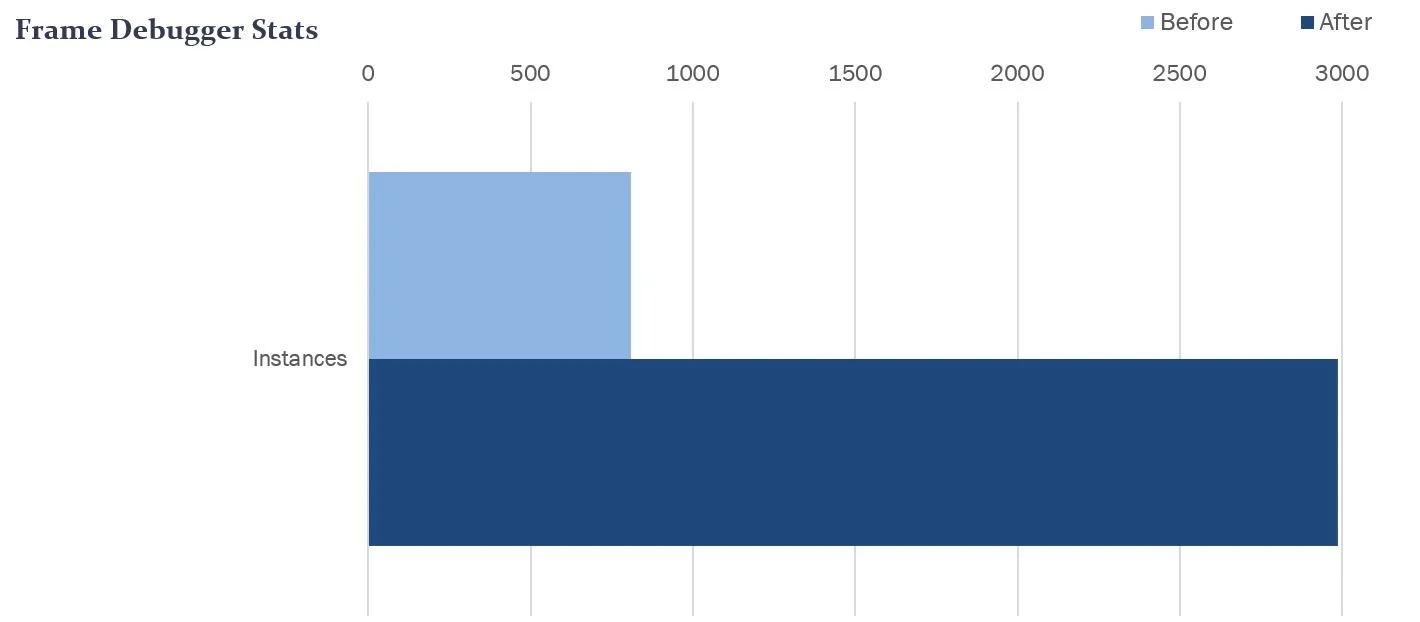

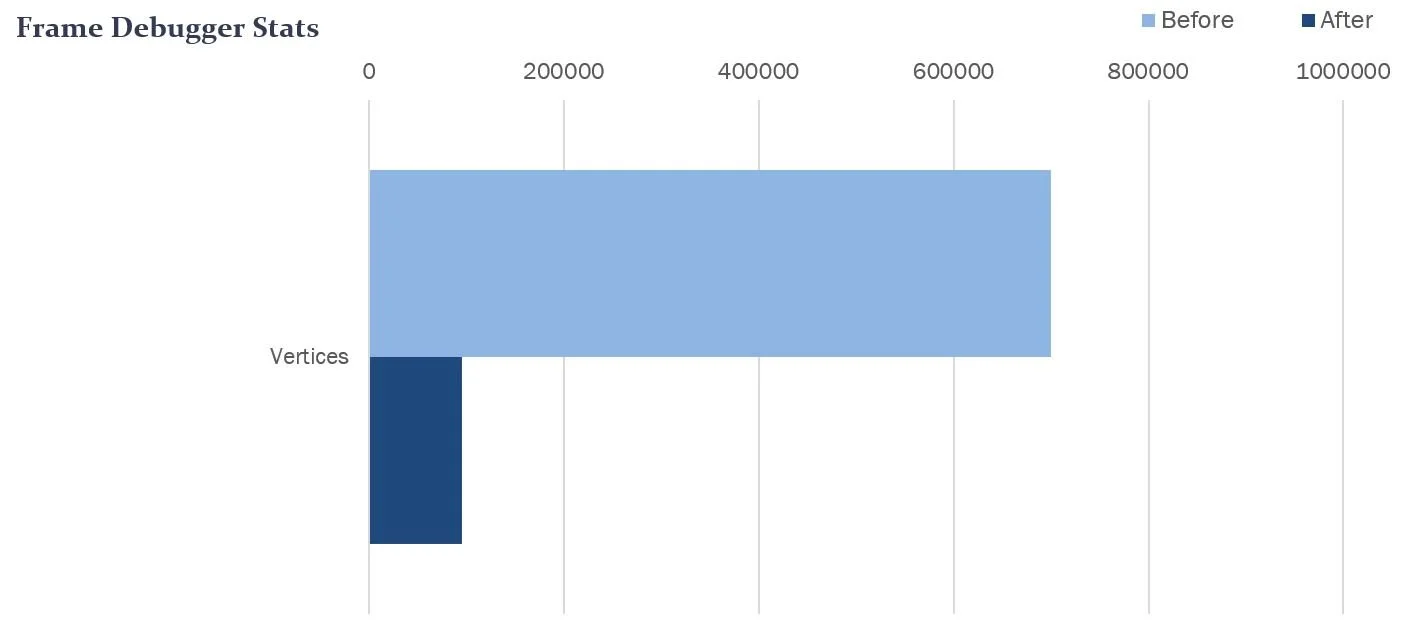
Wow that’s a big difference, you don’t really see it until you start to have many of them on screen. I might do another pass as well to reduce the amount of instance calls on the new version. The old version has less draw calls and instances, but exponentially more Vertices and Indices to handle. I feel like one more refining pass of this will really bring the Draw Calls and Instances down without effecting the Vertices and Indices count.
Cheers,
Steg